How to stop automatic updates on Windows 10

If you're fed up with Windows 10 installing updates automatically, then use this guide to stop this behavior and decide when to install them.

On Windows 10, quality updates (or cumulative updates) always download and install automatically as soon as they're ready for your device. While this approach makes sure that every computer has the latest security patches, performance, and stability improvements, it's also among one of the features that users complain the most.
Typically, it's because to apply updates, users are required to restart their devices, and because updates are also known to (sometimes) cause problems negatively affecting the user experience.
Whatever the reason it might be, depending on your edition of Windows 10, you can regain control and stop automatic updates using Group Policy and Registry.
In this Windows 10 guide, we'll walk you through the steps to block Windows Update from automatically downloading and installing updates on your computer.
How to disable automatic updates using Settings
If you're looking to postpone updates, you don't need to disable the feature permanently. You can pause updates until you're ready to install them. Using the Settings app, you can pause updates up to 35 days.
Disabling all updates
To temporarily disable automatic updates on Windows 10, use these steps:
Open Settings.
Click on Update & Security.
Click on Windows Update.
Click the Advanced options button.

Under the "Pause updates" sections, use the Pause until drop-down menu, and select how long to disable automatic updates.


Once you complete the steps, your device will no longer receive updates of any kind until the day you specified. When your device reaches the pause limit, you must allow Windows 10 to download and install the latest updates to make the option available again.
If you want to undo the changes, you can use the same instructions, but on step No. 5, choose the Select date option. Alternatively, you can click the Resume updates from the Windows Update settings page.
Disabling security updates
In addition to temporarily disabling all updates, Windows 10 also offers an option to defer only quality updates up to 30 days.
To disable security updates on Windows 10, use these steps:
Open Settings.
Click on Update & Security.
Click on Windows Update.
Click the Advanced options button.
Under the "Pause updates" sections, use the drop-down menu at the bottom of the page, and select the number of days that you want to defer quality updates (if applicable).


After you complete the steps, your computer will not download and install monthly quality updates until the schedule reaches its limit.
How to disable automatic updates using Group Policy
On Windows 10 Pro, you can use the Local Group Policy editor to disable automatic updates permanently, or you can change the Windows Update settings to decide when updates should install.
Disabling updates
To permanently disable automatic updates on Windows 10, use these steps:
Open Start.
Search for gpedit.msc and select the top result to launch the experience.
Navigate to the following path:
Computer Configuration\Administrative Templates\Windows Components\Windows Update
Double-click the Configure Automatic Updates policy on the right side.

Check the Disabled option to turn off the policy.

Click the Apply button.
Click the OK button.


Once you complete the steps, Windows 10 will stop downloading updates automatically.
While automatic updates remains disabled, you can still download and install patches manually from Settings > Update & Security > Windows Update, and clicking the Check for updates button.
If you change your mind, you can always revert the changes using the same instructions, but on step No. 5, make sure to select the Not Configured option.
Limiting updates
Alternatively, if turning off the policy isn't working, you can also try customizing the Windows Update settings using Group Policy to limit the availability of updates on your device.
To control Windows Update settings with Group Policy, use these steps:
Open Start.
Search for gpedit.msc and select the top result to launch the experience.
Navigate to the following path:
Computer Configuration\Administrative Templates\Windows Components\Windows Update
Double-click the Configure Automatic Updates policy on the right side.
Check the Enable option to turn on the policy.

In the "Options" section, you'll find a number of options to configure automatic updates, including:
Quick tip: The closest option to disable automatic updates is the 2 - Notify for download and auto install option, but you can select the option that best fits your situation.

2 - Notify for download and auto install.
3 - Auto download and notify for install.
4 - Auto download and schedule the install.
5 - Allow local admin to choose setting.
Click the Apply button.
Click the OK button.


After completing the steps, updates will stop downloading automatically. However, when a new update becomes available, you'll receive a notification to download and install updates manually from the Windows Update settings page.
How to disable automatic updates using Registry
If you're running Windows 10 Pro, you can also disable automatic updates in two different ways using the Registry.
Disabling updates
To permanently disable updates on Windows 10 modifying the Registry, use these steps:
Warning: This is a friendly reminder that editing the Registry is risky, and it can cause irreversible damage to your installation if you don't do it correctly. It's recommended to make a full backup of your PC before proceeding.
To permanently disable Windows Update using the Registry, use these steps:
Open Start.
Search for regedit and select the top result to launch the experience.
Navigate to the following path:
HKEY_LOCAL_MACHINE\SOFTWARE\Policies\Microsoft\Windows
Right-click the Windows (folder) key, select New, and then click on Key.

Name the new key WindowsUpdate and press Enter.
Right-click the newly created key, select New, and click on Key.

Name the new key AU and press Enter.
Right-click on the right side, select New, and click on DWORD (32-bit) Value.

Name the new key NoAutoUpdate and press Enter.
Double-click the newly created key and change its value from 0 to 1.

Click the OK button.
Restart your computer.


Once you complete the steps, Windows Update should stop trying to download and install updates automatically on your device.
If you want to update manually, you can perform this task from Settings > Update & Security > Windows Update, and clicking the Check for updates button.
Limiting updates
In the case that using the Registry to disable updates isn't working as expected, you can also use the Registry to customize the Windows Update settings to prevent updates from installing automatically.
To customize Windows Update settings to block updates with the Registry, use these steps:
Open Start.
Search for regedit and select the top result to launch the experience.
Navigate to the following path:
HKEY_LOCAL_MACHINE\SOFTWARE\Policies\Microsoft\Windows
Right-click the Windows (folder) key, select New, and then click on Key.
Name the new key WindowsUpdate and press Enter.
Right-click the newly created key, select New, and click on Key.
Name the new key AU and press Enter.
Right-click on the right side, select New, and click on DWORD (32-bit) Value.

Name the new key AUOptions and press Enter.
Double-click the newly created key and change its value (number only) using one of the following options:
These options work similar to the Group Policy settings, and number 2 is the closest option to disable Windows Update permanently. However, you can always select the setting the best suits your situation.

2 — Notify for download and auto install.
3 — Auto download and notify for install.
4 — Auto download and schedule the install.
5 — Allow local admin to choose settings.
Click the OK button.
Restart your computer.


After completing the steps, Windows 10 will stop installing updates automatically. However, you'll receive notifications as soon as new quality updates are available, but they won't download and install until you approve them manually.
You can always use the same instructions to restore the original settings, but on step No. 4, right-click the WindowsUpdate key, and select the Delete option. Then reboot your device to complete applying the settings.
Wrapping things up
Updates are crucial to safeguard your device and data and to improve the overall experience, as such it's never recommended to use an unpatched computer. However, there are many scenarios when disabling updates could make sense. For instance, when you may need to apply updates manually, or you want to make sure that a particular update doesn't have any issues before installing it on your laptop or desktop PC.
Also, this guide only stops monthly updates, which usually fix security vulnerabilities and improves the stability of Windows 10. If you want to avoid automatic installs of feature updates, such as the Windows 10 May 2019 Update, when the current installation is nearing the end of service, you need to modify the settings to defer major releases.
More Windows 10 resources
For more helpful articles, coverage, and answers to common questions about Windows 10, visit the following resources:

BUYER'S GUIDE
Check out these excellent Windows 10 laptops that come with LTE support
Need a quality Windows 10 laptop that can stay connected while on the go? Check out this roundup of the best devices complete with LTE modem.

STILL SLEEPY
Surface Laptop 3 and Pro 7 hit with slow Wi-Fi bug after waking from sleep
If you've hit some issues with slow Wi-Fi on your Surface Pro 7 or Surface Laptop 3, you're not alone. There are several reports of both devices suffering from the issue after waking from sleep, but there may be a workaround.

4K HDR PASS-THROUGH
Elgato HD60S+ Capture Card review: An Xbox One X streamer's dream
The new Elgato HD60S+ is a dream streaming tool for anyone who games in 4K HDR, such as on the Xbox One X and PS4 Pro. Here's our review.

HONEY I SHRUNK THE COMPUTER!
These are the best PC sticks for when you're on the move
Instant computer, just add a screen! That’s the general idea of the ultra-portable PC Compute Sticks, but it can be hard to know which one you want. Relax, we’ve got you covered.
View Comments (82)
PROTECT YOURSELF
PureVPN is 85% off, securing your web browsing for less than $2 per month
 TIME FOR TESTING
Windows 10 20H1 build 19013 rolls out to Fast ring with new kaomoji, much more
29 Oct 2019 1
 Source: Windows Central
Say hello to some new kaomoji, along with a tong of fixes and improvements.
What you need to know
A new Windows 10 preview build is available for Fast ring Insiders.
This release pushes the build number to 19013 and includes a ton of fixes and improvements.
Insiders on the Fast ring can download this release via Windows Update now.
What's new in build 19013
More kaomoji: [B]ased on your feedback, in this build we're updating our kaomoji list with a few more favorites, including:
ヾ(⌐■_■)ノ♪
ლ(╹◡╹ლ)
(⊙_◎)
( ͡~ ͜ʖ ͡°)
ಠ_ರೃ
(∩^o^)⊃━☆
/ᐠ。ꞈ。ᐟ\
And more! Enjoy (❁´◡`❁)
Windows Subsystem for Linux (WSL) 2 will now release unused Linux memory back to your Windows machine: Previously, your WSL 2 Virtual Machine's (VM) memory would grow to meet the needs of your workflow, but would not shrink back down when the memory was no longer needed. With this change, as memory is no longer in use in the Linux VM, it will be freed back to Windows, which will shrink in memory size accordingly.
Your Phone app–Elevating the Phone screen feature by removing its dependency on Bluetooth connection: Windows Insiders, we heard your feedback about the Phone screen feature's dependency on Bluetooth Low Energy connectivity. To address your feedback, we partnered closely with Samsung to bring you a more streamlined experience across all Windows 10 PCs by removing the peripheral role dependency for Phone screen, which will expand the overall reach of this feature.
Samsung Galaxy Note 10 was the first device to introduce this feature in August. After a positive response, we've recently enabled this feature across Samsung Galaxy Fold, S10, S10+, and S10e smartphones. You'll need to update your supported Samsung devices with the recent software update that enables the 'Link to Windows' feature. To continue offering this experience to other smartphones, we're expanding this feature support to Samsung Galaxy A30s, A50s, and A90 smartphones, and we'll continue to add additional devices in the coming months.
With the new experience rolling out, we'll be removing the Bluetooth connectivity option, effective immediately. If you were previously enjoying Phone screen over Bluetooth and you have a phone model that doesn't yet support Link to Windows, the Phone screen node will disappear automatically within the Your Phone app. We recommend that you unpair your devices by going to the Bluetooth settings on both your PC and your Android phone, so that you don't have a connection that is no longer in use.
General changes, improvements, and fixes for PC
We fixed an issue resulting in frames being skipped, starting with Build 19002, when running games and videos fullscreen.
We fixed an issue where initiating "Reset this PC" with the cloud download option wasn't working when started from Windows RE.
We fixed an issue resulting in preinstalled apps (like Calculator) and other UWP apps being missing from the Apps & Features page in Settings.
We appreciate your patience while we worked on our sync engine. As of this build, wallpaper and theme syncing is now up and running again.
We fixed an issue resulting in Wi-Fi unexpectedly resetting (turning off and back on) frequently in recent flights.
We fixed an issue where Wi-Fi Settings might get stuck saying Connecting, even though the network flyout (correctly) indicated that you were Connected.
We fixed an issue where an update being temporarily suspended would result in an 0xc19001e1 error being displayed in Windows Update history.
We fixed an issue resulting in the "Open location" search result option not working if the search result was a folder.
We fixed an issue where if you moved Cortana's window to certain places on your screen, and then closed the window, the minimize animation wouldn't go towards Cortana's icon on the taskbar.
We fixed an issue resulting in File Explorer not rendering correctly sometimes when using multiple monitors with different DPIs on the previous flight.
We fixed an issue where you could get into a state where it wasn't possible to set focus to File Explorer's search box in order to type your query.
We fixed an issue that could result in the app thumbnail disappearing when you right clicked it in Task View.
We fixed an issue that could result in the Send Message button in certain notifications not being visible when using High Contrast White.
We fixed an issue where the notification following WIN+Shift+S might have a blank space for the screenshot (rather than actually displaying the screenshot).
We fixed an issue resulting in Resource Manager unexpectedly not showing any disk activity.
We fixed an issue where, if you called SUBST with a path ending with a \ it would give a Path not found error.
We fixed a memory leak with running apps that repeatedly sent calls to adjust gamma.
Some of you have reached out about when trying to shutdown, seeing a message saying that an app named "G" was preventing shutdown. We investigated and found an issue where windows related to GDI+were only referenced as "G." We've fixed this, so going forward, these will now have the name "GDI+ Window (
)", where will show the .exe name of the app using GDI+.We fixed an issue resulting in speechruntime.exe using an unexpectedly high amount of CPU on the previous flight.
We fixed an issue resulting in Bluetooth devices potentially not reconnecting as expected after closing then reopening the device lid for certain devices.
We fixed an issue resulting in the Surface Dial not scrolling in recent builds if you switched to something like zoom and then back to scrolling.
Thank you Insiders who shared feedback about the 2-in-1 convertible tablet experience improvements we discussed here. For the time being, we're returning to the current experience in retail.
We fixed an issue where Narrator would sometime report focus as the page instead of reporting the actual focused control within Chrome.
We fixed an issue where Narrator would not automatically start reading the Narrator user guide webpage and the YouTube webpage.
We corrected Narrator's "Next Table" command so that it would work in Excel.
We fixed an issue where the text cursor indicator was visible on top of the lock screen background picture.
We fixed an issue where the text cursor indicator preview wasn't displaying correctly in Settings when using dark theme.
We fixed an issue where when using dark theme, the hardware keyboard text prediction candidate window was unreadable due to black text on a dark grey background.
We fixed an issue that could result in the touch keyboard flickering when inputting emoji.
We fixed an issue where English punctuations were outputted when using the Chinese Pinyin and Wubi IMEs, even if input mode was set to Chinese under the default IME settings. Thanks for your feedback.
We've fixed an issue where the character width of alphanumeric characters when using the Traditional Chinese Bopomofo IME would change from half width to full width unexpectedly in some input fields. Thanks for reporting it! If you feel this issue hasn't been fully addressed in the new version of Bopomofo IME, please let us know your feedback.
We've fixed an issue where after successfully updating to a new build, the Windows Update Settings page may have shown the same build needed to be installed.
We've fixed an issue where Optional drivers were failing to install.
If you're enrolled in the Fast ring, you can download build 19013 now via Windows Update. For more on this release, check out Microsoft's full release notes, which cover known issues, at the Windows Blog.
View Comments (1)
LOAD UP NOW
Get a free Echo device with the purchase of this discounted Ring hardware

We may earn a commission for purchases using our links. Learn more.
INSTALLING WINDOWS 10How to install Windows 10 from USB with UEFI support
About to install Windows 10 on a PC using UEFI? Use these steps to create a compatible USB bootable media to perform this task.29 Oct 2019 28

Usually, when you have to install a clean copy of Windows 10, you'll need a USB bootable media to start your device and continue with the setup wizard. However, if you're using a computer with a Unified Extensible Firmware Interface (UEFI), instead of the legacy Basic Input/Output System (BIOS), you have to make sure that the media will work with your motherboard firmware type.
If you're using a newer firmware type, there are multiple methods that you can use to create a media to install Windows 10 from USB. Although it's not advertised, you can use the Microsoft Media Creation Tool to download the installation files onto a removable drive with support for both UEFI and the legacy BIOS. Alternatively, you can also use Rufus, which is a third-party tool that makes it easy to create an installation boot media with support for UEFI.
In this Windows 10 guide, we'll walk you through the steps to create a USB flash drive that includes UEFI support using the Microsoft Media Creation Tool and Rufus.
How to create a Windows 10 UEFI boot media using Media Creation Tool
If you have a system using UEFI, you can use the Media Creation Tool to create a bootable USB media to perform an in-place upgrade or clean installation of Windows 10.
To create a bootable media, connect a USB flash drive of at least 8GB of space, and then use these steps:
Under the "Create Windows 10 installation media" section, click the Download tool now button to save the file on your device.

Double-click the MediaCreationToolxxxx.exe file to launch the tool.
Click the Accept button to agree to the Microsoft terms.
Select the Create installation media (USB flash drive, DVD, or ISO file) for another PC option.
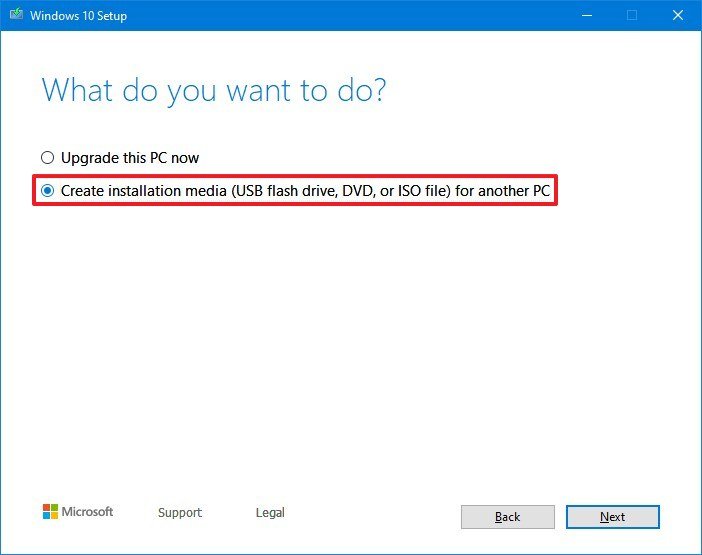
Click the Next button.
Clear the Use the recommended options for this PC option (if applicable).
Select the correct language, architecture, and edition of Windows 10.

Quick tip: If you'll be installing Windows 10 on multiple devices running 32-bit or 64-bit architecture, then use the "Architecture" drop-down menu and select the Both option.
Click the Next button.
Select the USB flash drive option.
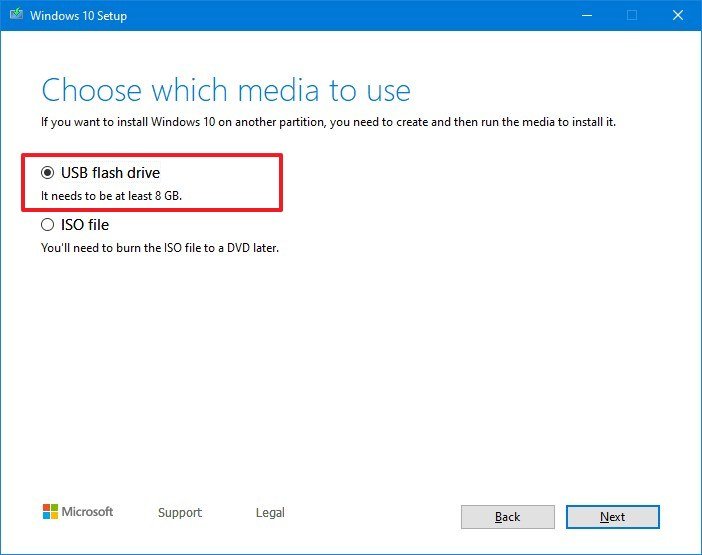
Click the Next button
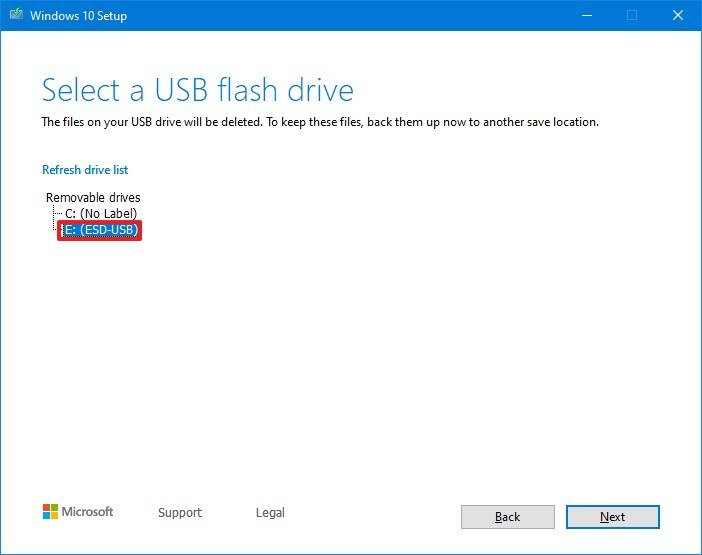
Select the removable drive from the list. (If you don't see the drive, click the Refresh drive list option.)

Click the Next button.
Click the Finish button.


Once you complete the steps, the tool will download the required files and create a bootable USB flash drive with the Windows 10 installation files with support for UEFI and BIOS.
How to create a Windows 10 UEFI boot media using Rufus tool
If the Media Creation Tool isn't working, you can use Rufus to create an installation media with UEFI support using an existing ISO file. Or you can also use the tool to download the Windows 10 files from the Microsoft servers and create the bootable flash media.
Creating boot media with Windows 10 ISO
To create a bootable media using a Windows 10 ISO file that you already have, connect a USB flash drive of at least 8GB of space, and use these steps:
Under the "Download" section, click the latest release of the tool to save the file on your device.

Double-click the Rufus-x.x.exe file to launch the tool.
Under the "Device" section, select the USB flash drive with at least 8GB of space.
Under the "Boot selection" section, click the Select button on the right side.
Select the Windows 10 ISO file from its folder location.
Click the Open button.
Use the "Image option" drop-down menu to select the Standard Windows installation option.
Use the "Partition scheme" drop-down menu to select the GPT option.
Use the "Target system" drop-down menu to select the UEFI (non CSM) option.

Under the "Show Advanced drive properties" section, leave the default settings.
Under the "Volume label" field, enter a descriptive name for the drive — for example, "win10_1903_usb."
Under the "File system" and "Cluster size" section, leave the default settings.
Click the Show advanced format options button.
Select the "Quick format" and "Create extended label and icon files" options.
Click the Start button.
Click the OK button to confirm.
Click the Close button.


After you complete the steps, Rufus will create a bootable USB flash drive to install Windows 10 with the image that you provided.
Creating boot media downloading Windows 10 ISO
If you don't have a Windows 10 ISO file, you can use Rufus to download the ISO from the Microsoft servers and create the bootable USB flash media. Connect a USB flash drive of at least 8GB of space, and use these steps:
Under the "Download" section, click the latest release of the tool to save the file on your device.
Double-click the Rufus-x.x.exe file to launch the tool.
Under the "Device" section, select the USB flash drive with at least 8GB of space.
Under the "Boot selection" section, click the arrow button next to the "Select" option, on the right side, and choose the Download option.

Click the Download button.
Use the "Version" drop-down menu and select Windows 10.
Click the Continue button.
Select the 19H1 (Build 18362.30 - 2019.05) option to download the Windows 10 May 2019 Update.
Click the Continue button.
Use the "Edition" drop-down menu and select the Windows 10 Home/Pro option.
Click the Continue button.
Use the "Language" drop-down menu and select your installation language.
Click the Continue button.
Use the "Architecture" drop-down menu and select the 32-bit or 64-bit (recommended).
Click the Download button.

Select a folder location to temporarily download the ISO file from the Microsoft servers.
Click the Save button.

Use the "Image option" drop-down menu to select the Standard Windows installation option.
Use the "Partition scheme" drop-down menu to select the GPT option.
Use the "Target system" drop-down menu to select the UEFI (non CSM) option.

Under the "Show Advanced drive properties" section, leave the default settings.
Under the "Volume label" field, enter a descriptive name for the drive — for example, "win10_1903_usb."
Under the "File system" and "Cluster size" section, leave the default settings.
Click the Show advanced format options button.
Select the "Quick format" and "Create extended label and icon files" options.
Click the Start button.
Click the OK button to confirm.
Click the Close button.


Once you complete the steps, the tool will run the script to download the Windows 10 ISO file from the Microsoft servers, and then, it'll use that ISO to create a bootable media, which you can then use to install Windows 10 on devices using UEFI.
Now that you have a USB bootable media with support for UEFI, you can start your computer to perform an in-place upgrade or clean installation of Windows 10.
More Windows 10 resources
For more helpful articles, coverage, and answers to common questions about Windows 10, visit the following resources:
We may earn a commission for purchases using our links. Learn more.
View Comments (28)PROTECT YOURSELF
PureVPN is 85% off, securing your web browsing for less than $2 per month

We may earn a commission for purchases using our links. Learn more.
RECORDED OCTOBER 25 2019Windows Central Podcast 153: Surface Week!
This week on the Windows Central Podcast: Windows 10 plans, Surface reviews, and more!29 Oct 2019 0
 Source: Windows Central
We're back with another exciting episode of the Windows Central Podcast, and this week Daniel Rubino and Zac Bowden talk about Microsoft's Q1 earnings along with forthcoming updates to Windows 10 before diving into their reviews of Surface Pro 7 and Surface Laptop 3.
They provide advice on who should upgrade to which models and compare the AMD-based consumer version of the 15-inch Laptop 3 vs. the Intel-based business edition. Additionally, Daniel professes his love for Alcantara. But as Zac reminds him: humans are gross.
This episode of the Windows Central Podcast was recorded on October 25 2019.
Links:
Microsoft Q1 earnings: $33.1 billion in revenue as the cloud continues to shine | Windows Central
Here's why 'Instant On' is a huge deal for Surface Pro 7 and Surface Laptop 3 | Windows Central
Internal Windows 10X documentation leaks, revealing new OS details | Windows Central
Windows 10 May 2019 update picks up another round of optional fixes | Windows Central
Windows 10 20H1 build 19002 rolls out to Fast ring Insiders | Windows Central
Surface Laptop 3 15-inch review: Loads of good looks, very little substance | Windows Central
Surface Pro 7 review: Microsoft's king of the 2-in-1s retains its crown | Windows Central
Subscribe to the podcast
Download directly: Audio
Listen via Spotify
Listen via: Windows Central app Windows 10 | Android
Subscribe via iTunes
Subscribe via RSS
Subscribe via Google Play Music
Subscribe via Pocket Casts
Hosts
Make this show great by participating!
Send in your comments, questions, and feedback to:
Email: wcpodcast@windowscentral.com
Twitter: @WindowsCentral with hashtag #wcpodcast
We may earn a commission for purchases using our links. Learn more.
View Comments (0)PROTECT YOURSELF
PureVPN is 85% off, securing your web browsing for less than $2 per month
 CH-CH-CH-CHANGES
Microsoft's Windows 10 20H1 release will be first to RTM in December under Azure schedule
20H1 is Microsoft's first version of Windows 10 to be finalized under the Azure development cycle.28 Oct 2019 7
What you need to know
Windows started operating under Azure's development schedule earlier this year.
This means feature updates will now be finalized in December and June.
Windows 10X will RTM with 20H2 in June 2020.
Microsoft's upcoming 20H1 release of Windows 10 will be the company's first version of the OS to be finalized in December, three months earlier than usual, as a result of Windows moving under Azure and adopting the "semester" based development cycle that Azure is already using. Mary-Jo Foley was first to reveal that the Windows dev cycle was being changed up earlier this year, but here's what this all means for Insiders.
In the past, Windows 10 feature updates were typically finalized in March and September, but now, these OS releases are expected to be done in December and June instead. This doesn't mean Microsoft is giving feature updates less development time; this is just a result of Microsoft outright shifting the development cycle of Windows 10 updates by two to three months. Each release still gets the usual seven to nine months in development.
Microsoft was able to make this change thanks to a decision it made when first moving Windows under Azure. To allow the Azure and Windows development schedules to align, it needed to skip a feature release. Windows 10's 19H2 release is the result of this, being an update that isn't a proper OS release like previous ones before it.
This means Windows 10's 20H1 release is just about done. It was marked as feature-complete internally back in August, and Microsoft has been mostly focused on fixing up bugs and polishing the OS for release ever since. This is why Insiders have not seen any substantial new features in 20H1 builds for a couple of months, because the 20H1 release is done. We've got a month or so left of development before Microsoft signs-off on 20H1 in mid-December.
Windows 10 20H2
 Source: Microsoft
This also means that work on the next Windows 10 feature update after 20H1, known as 20H2 or "Manganese" has already started development internally, and Insiders should begin receiving 20H2 builds in the next couple of weeks. On this new development cycle, 20H2 will RTM in June 2020. This is important, as this release will play a vital role in the availability of Windows 10X on new foldable PCs expected to start shipping in fall 2020.
Now that 20H2 can RTM earlier in the year under the new dev schedule, Microsoft can use 20H2 as the shipping version of Windows 10X that's preloaded onto devices like the Surface Neo. This means Windows 10X will RTM in June alongside 20H2, and not with 20H1 as we had initially assumed. Microsoft needs the extra development time to make sure Windows 10X is as good as it can be at launch.
Regarding desktop releases, does this mean new feature updates will be made available to the public earlier than previously? Right now, I'm not too sure. As 20H1 will be done in December, Microsoft could start shipping the update to the public as early as January, but none of my sources seem to be clear if that's actually what's happening. Microsoft may decide to keep pushing out new feature updates in the spring and fall, utilizing the Slow and Release Preview ring for extensive testing of the final build before it goes to the public.
Update October 29, 2019: I'm hearing that Microsoft intends to get the RTM build out to Insiders in the Slow ring around mid-December. It'll then go to the Release Preview ring in January, before being released officially to the public in March/April, just like previous updates. So RTM is earlier, but public availablity is around about the same.
Either way, Windows is now operating under Azure's development schedule, and that means we can expect to see new feature updates finalized earlier than we've seen in the past. What are your thoughts on these changes? Let us know in the comments.
View Comments (7)LOAD UP NOW
Get a free Echo device with the purchase of this discounted Ring hardware

Zac Bowden
Zac Bowden is a Senior Editor at Windows Central. Bringing you exclusive coverage into the world of Windows 10 on PCs, tablets, phones, and more. Also an avid collector of rare Microsoft prototype devices! Keep in touch on Twitter: @zacbowden.

We may earn a commission for purchases using our links. Learn more.
THE FIXES ARE INWindows 10 May 2019 update picks up another round of optional fixes
A new optional cumulative update is now rolling out.24 Oct 2019 4
 Source: Windows Central
What you need to know
Microsoft rolled out another Windows 10 cumulative update for May 2019 Update PCs today.
The update is optional, but it's packed with fixes.
You can download the update now via Windows Update.
Microsoft today pushed another cumulative update out for Windows 10, this time for PCs on the May 2019 Update. For this round of fixes, the update is optional, though they'll be included with future cumulative updates as per usual.
Today's update pushes the May 2019 Update to build 18362.449 with KB4522355. Included are several fixes related to issues with Narrator, the Start menu, and more. Here are the highlights:
Updates an issue that prevents Microsoft Narrator from working in certain touch mode scenarios.
Updates an issue that starts assistive technology (AT) (such as Microsoft Narrator, Magnifier, or NVDA) after signing in when you've configured it to start before signing in.
Updates an issue that causes Magnifier to stop working in certain scenarios, and you have to restart it manually.
Updates an issue that causes Microsoft Narrator to stop working in the middle of a session in certain scenarios.
Updates an issue that might prevent a scroll bar from being selected.
Updates an issue that allows a device to go to Sleep (S3) even if you configure the device to never sleep.
Updates an issue that prevents you from shrinking a window in some cases.
Updates an issue that prevents you from connecting to a virtual private network (VPN).
Updates an issue that causes screen flickering or is slow to display the screen when you show application thumbnails on a monitor that has high dots per inch (DPI).
Updates an issue that causes the tile for the Photos app to appear larger than expected in the Start menu under certain conditions.
Updates an issue that causes the system to stop responding at the sign-in screen.
Updates an issue that might cause a black screen to appear the first time you sign in after installing a feature or quality update.
Updates an issue that causes the Start menu, the Cortana Search bar, Tray icons, or Microsoft Edge to stop responding in certain scenarios after installing a monthly update.
There aren't any know issues to be aware of with this release. If you're running a PC with the May 2019 Update, you can download KB4522355 via Windows Update now. The fixes are also available as a manual download from the Microsoft Update Catalog.
Requires Login